Saturday, July 30, 2011

Vintagey Wedding Card

I made 2 wedding cards last week and sadly I sealed one up before I remember to take some pics BUT never fear for here is my vinatge-y wedding card.

I made this card for my sister in law (we'll call her Sil from now on, how's that?).  She and her boyfriend Drew are going to a wedding here in Vancouver today!  So I offered to make a card for her to give to the happy couple. 
Plus I really like making cards, or didn't you notice?
~ front ~

~ inside ~

~personalized matching envelope ~


I don't have an etsy shop or anything, but I'm always open to making cards for anyone who asks.  Simply send me an email at westcoastleslie@gmail.com and we can chat about the theme and colour (and price) that's right for you!

Wednesday, July 27, 2011

Zucchini Patties

I was tempted to put this under "30 Days of Salad" but I think if if gets fried in a skillet it's officially not a salad.  Too bad.  But this is still a tasty, vegetarian friendly recipe (and carnivore's like it too).

What You'll Need
1 1/2 cups raw shredded zucchini
2 tbls minced onion
2 tbls mayonnaise (I used Miracle Whip)
1/4 cup flour
1/4 cup grated Parmesan cheese
2 eggs
oregano to taste
salt & pepper to taste

Once you've shredded the zucchini, try to press out as much extra moisture as you can with a paper towel.  Be careful, because the zucchini shreds will stick to the paper towel. 

Add the remaining ingredients to the shredded zucchini.  I crack my eggs in a separate bowl to make sure they're 'good eggs' and then I gave them a little whisk with a fork before adding them in.

Spoon about 1/4 cup or less of the batter into a pre-heated skillet with a little melted butter.  Try to flatten out your batter (make thin patties) or you might end up with a case of "burnt on the outside, raw on the inside", which is never good.  This time I made mine really thin, and they cooked better and got nice and crispy.

Serve topped with tomato sauce (I used Prego) and either Parmesan or shredded mozzarella cheese!  I like them plain too with a little extra salt and pepper.  They're almost like mini pizzas and a great way to trick kids into eating their veggies!

It's Thursday, so you know where I'm partying.....

Summertime Wreath

Have you ever seen something so lovely and foolishly thought "hey I bet I could do that!"  This happens to me all the time. usually I fall in love with a sewn project, which if you haven't noticed aren't my forte, so I don't get too hung up on them.  But every once and a while a project comes along using a glue gun and/or tissue paper and I get all cocky and i say to myself "I can totally do that!" HA! Once again I fooled myself into thinking I could recreate someonelse's creation....

This week I finally decided to recreate Kim's (from Bugaboo, Mini, Mr & Me) farewell to summer wreath. It's so awesome, I needed to make one!  Kim offers a pretty great tutorial but like all crafts so much is trial and error....oh not to mention I'm horrible at making rosettes, so this should be interesting!
First cover something circular in tissue paper
(I went out an bought a flat styrofoam circle and it worked really well.)

Then start cutting the tissue paper in strips the long way, against the folds.  I kept the tissue paper folded as I cut my strips....this is super efficient and saves you a lot of time.  Plus the sides will be straighter...if you care about that kind of thing. 
I cut two and a half pieces of tissue paper to make all my rosettes. 


I followed Kim's directions to twist and roll (like any other rosette) but they didn't turn out as poufy as hers.  See I told you I stink at making these. I think I get too caught up in the twisting and I wrapped them too tight! My roses are flat, scrawny little things!  I even made extras to overlap & add some depth!
If you think making the rosettes is tedious (it took me 2.5 hours from the time I started to glueing the last rosette on-but I'm just that special) just wait until you start filling in the edges with the poufs!  Of course your rosette making skills (and distraction level "ooh Oprah's on") will dictate how long it takes.


For the 'petals' I used the old elementary school trick of putting the tissue paper squares on the end of a pencil and then gluing them down.  It saved my fingers a lot of hot glue burns!  I highly recommend this method! 


All that finnicky work is worth it though!  Isn't she a beaut?
I really like my version, even if it's not exactly like Kim's.  I added a few poufs of tulle here and there and also added small pearls in the centre of random roses. 
I hope Kim doesn't mind my additions.


Party Party!


Monday, July 25, 2011

Nachos...Flanders' Style

Ah yes, I knew it was only a matter of time before a Simpson's reference popped up on my blog!  I should note that Ty is a staunch Simpsons fan and we watch it regularly, even ru-runs.  Jill got him Homer slippers a few years back for Christmas, he's got a Simpson's trivia game (which I'm actually quite good at) and I think we have the Simpsons Movie on Blu-Ray....and you've got to admit that there are some great quotes that you use probably without even realising it.

One of those quotes happens to be from Episode 3 of Season 7.  It's the one where Lisa and Bart get taken away by child services only to be transplanted nextdoor with the Flanders!  There are actually a lot of funny moments from that episode...but I digress.


The point?  In the episode, Ned offers Bart & Lisa nachos, "yay!".....Flanders' style.  Do you know what "Nachos, Flanders' Style" are?  They are cucumber slices with cottage cheese!  And they are delish!  They are a perfect summer snack, with a great refreshing crunch of cucumber and the creamyness of cottage cheese.  Add a little salt and pepper and you're good to go. 

I dare you to try this some time-you'll fall in lov-diddly-ov!

Sunday, July 24, 2011

Scavenger Hunt Sunday

Here we are folks, another Scavenger Hunt Sunday!  I was really intrigued by the prompts this week....maybe because they were non-photography words and I didn't get intimidated by them :)   As always, a big "THANK YOU" to the lovely Ashley Sisk.  She is so inspiring, not to mention gorgeous (did you see her profile on her header-lurvely!)
*I wasn't able to find 2 pics good enough, but I will keep hunting!*


This week's magic words are
Music to My Ears, Hat, Clear, Out Of This World & Sprinkles

1). Music To My Ears

2).  Hat
This is my beloved Boston Red Sox hat. 
Very excited to see them play on August 13th in Seattle

3). Clear
I think this picture is a bit of a stroke of genius really-if I do say so myself.  How many definitions of 'clear' do you see in this photo?

4). Out Of This World

I couldn't pick just one of the photos for "out of this world".  I knew this was what I wanted to shoot, but I had no idea I'd love them SO much!

5). Sprinkles


Thursday, July 21, 2011

Silhouette Dreams

Ok so I don't actually have a Silhouette cutter-yet!  I am planning on getting one....or putting it on my registry...oh my gosh what a brilliant idea!  Anywho-my sister Jill bought one with her tax return refund, lucky duck.  So of course, my list of "Jilly please make this and send it to me" is growing daily. 

And here's my first request.
A giant letter "K" in vinyl.

 First things first....remember this hunk of junk?
I salvaged it from my old office = free! 
I just had to figure out something cute to do with it.....
Beautiful huh? 
It was part of What the Heck Wednesday a looooong time ago! 
And we got some great ideas. 
So I finally put one of those good ideas to work!  Only after I spray painted my tray did I go look at the graphic that was suggested!  So cute.  I always forget about the Graphics Fairy....I think I might spend the rest of my day on her site!

So here is the tray after
I know it's only spraypaint but I love it SO much more already!

 On Jill's advice I downloaded the Silhouette software onto my computer so I could make the design I wanted and then send it to her to cut out!

Here are my two favourite fonts


Which one do you like better?

I think I might have already made up my mind, but maybe someone can persuade me otherwise!  I will likely have to waterproof modge podge or spray a laquer over the final product to make sure the vinyl doesn't come off.  Any tips and tricks you've got about the subject are always greatly appreciated. 

Check back soon to find out which font a picked and how it looks all finished.
HookingupwithHoH

Pie Irons

Some people call them Bush Pies, some call them Pie Irons. 
Some of you are looking at me like I'm a crazy person....which isn't entirely untrue!
 
Pie Irons are basically sandwiches, or pies if you prefer, cooked over an open fire....when you're camping.  I made these while I was in Saskatchewan camping with Ty's family.  Y'all know I like a hearty breakfast and this is right up there on my favourite breakfast list....I think I'm turning into Ron Swanson, who also has an insatiable hunger for breakfast foods!
 
Step 1). Butter the outside of your bread, like you would for grilled cheese, and place the buttered side down in the pie iron.

Step 2). Mush the middle of the bread down to make a 'divet'

Step 3).  Carefully crack an egg into the 'well'. 
It's quite shallow so I'm warning you now!

Step 4). Butter another piece of bread and push it into the other side of the pie iron.

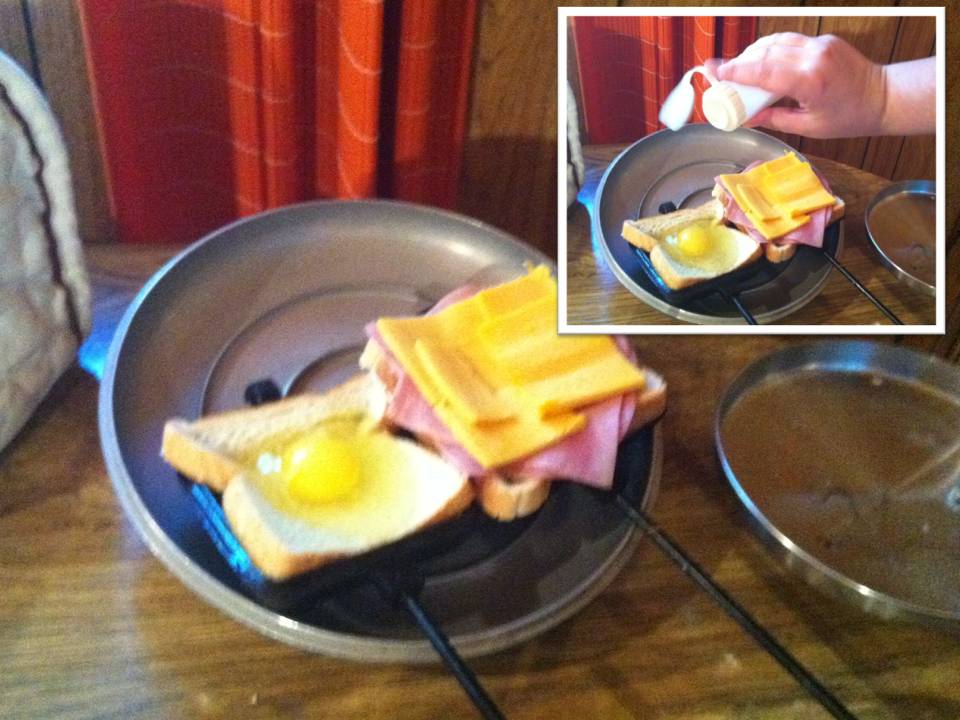
Step 5). Add sliced ham or turkey and cheese to the non-egg side
Step 6). Add salt and pepper to taste (inset)

Step 7). CAREFULLY close the pie iron. HINT bring the ham and cheese side to the egg side, not the other way around...or else you'll be in trouble!

Step 8). Cook on an open fire.  NOTE: do not cook over flame.  Flaming fires are not cooking fires.  Essentially you want hot hot coals to cook on.  This is the most efficient method and will result in the most even cooking! You may have to pull the pie iron out and gently open it to see how it's doing.  Once you've decided it's done, take the pie iron out of the coals and let it sit. 
The egg will continue to cook without burning your toast!


Step 9). ENJOY!

This is a breakfast style Pie Iron.  You can also make pizza pie irons, with pizza sauce, salami and cheese or ham, cheese and salsa sandwiches!  You can also make dessert bush pies.  For these tasty treats, use cherry, blueberry or peach pie filling !  My family used to make dessert pie irons before going to bed when we camped.  They make a great night snack, since by the time you're ready for them the fire has died down and is ready for pie irons & s'mores!

Rome Cast Iron Square Pie Iron - Dick's Sporting GoodsFYI: you do need the pie iron cooker (for lack of a better word). Also, keep in mind that a cast iron version (opposed to the aluminium) will be VERY heavy and not ideal for kids....even I had a tough time grappling with the cast iron version!  Yanks, I've found these at Cabela's ,and these at Dick's Sporting Goods.  Canucks, I know you can get these at Canadian Tire and almost anywhere that sells camping goods!  I even found a Pie Iron Cookbook at Canadian Tire!  Where else!??!! 

I hope you'll give these a try the next time you're out camping-they are really fun and delicious.  Food is SO MUCH better when cooked outside!